Tyler Manes is the defensive coordinator at Southwest Florida Christian Academy in Fort Myers, Florida.
He and I spent almost SIX HOURS going through everything you need to know about installing one of the most popular defensive schemes in the game today.
Coach Manes has learned (and borrowed) from a lot of smart coaches and has adapted and simplified the Dave Aranda scheme for the high school level.
I learned a TON going through this process, and I know you will too, so I wanted to share a few things I took from the clinic he put together.
Before we get started, you can grab the entire series of videos on the Tite Front HERE.
This video series will give you all the foundational knowledge you need to understand and implement the Tite 3-4 scheme.
Now let’s get started.
What is the Tite Front?
The term “Tite” refers to the alignment of the three down linemen in the front, with both defensive ends in a 4i and the nose in a head up zero technique.
This means a defense has a few different options for how they play their linebackers behind this look. With the traditional 3-4 look like Coach Manes plays, you’ll have both inside backers aligned at depth behind the guards.
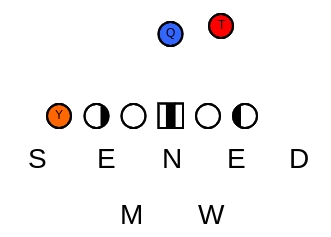
Other teams like playing a “stacked” look where each lineman has a linebacker “stacked” behind them at depth. Both looks can be referred to as a TIte front.
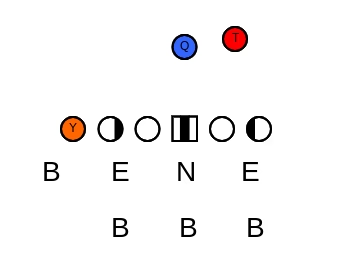
In this clinic series, Coach Manes will go in depth about the 3-4 style of Tite Front, and all the coverages, fronts, and pressures he teaches with it.
The Two Ways to Coach Defensive Ends in the Tite Front
Let’s start up front (where else?) to talk about the Tite front.
There are two main ways to coach the defensive ends in this scheme, so let’s review them…
React-Attack
This all starts by coaching the DE to play through the hips and hands. He should have his inside hand on the V of the neck of whoever he’s playing across from, and his outside hand on that outside shoulder.
Coach Manes teaches this as “See what you hit”.
If I’m DE in the Tite front, I’m reading the tackle’s inside hip across from me, keeping that guard in my peripheral vision. If the guard pulls away, or if he doubles me, or if I get full flow to me, I can react accordingly.
Other coaches like to read the outside hip of the guard, but Coach Manes feels like the way he does it is simpler for his kids to learn and execute.
Attack-React
The “Attack-React” style is the opposite of this.
You’re slanting and ripping into gaps, looking for depth and penetration, and you’ll start chasing the ball once you get that 2-3 yards of depth you’re looking for.
This is useful if you’ve got smaller kids up front, and not “true” 3-4 style defensive linemen. As a result you’ll have to be more aggressive up front instead of waiting for those offensive linemen to come to you.
There is nothing set in stone that says you have to play React-Attack only in the Tite front. You can definitely do both, but Coach Manes (and a lot of other coaches) prefer to major in React-Attack.
Let’s talk about why.

Why Dave Aranda prefers React-Attack in the Tite Front
Dave Aranda, Nick Saban, Kirby Smart, and many others prefer the React-Attack approach. To understand why, we need to go back to the whole purpose of playing the Tite front.
The Tite front is the modern adaptation of the Buddy Ryan Bear Front. While the double three techniques in the 46 defense were designed to stop 2-back teams, the double 4i techniques in the Tite front are designed to stop one-back teams.
The end goal is the same for both: Keep the inside linebackers free to pursue the ball carrier and prevent the offensive line from getting off double teams and sealing those guys off.
But what does that have to do with Attack-React?
Well the problem with being overly aggressive and slanting too much is that it usually ends up defining the responsibilities for the O-Line very quickly. This can result in the offensive linemen coming off doubles quicker, giving them more time to get to the second level and get to those linebackers.
This defeats the whole point of getting in the Tite front.
On the other hand, when Coach Manes plays a React-Attack style up front, it tends to muddy up the picture for the offensive line, meaning that those linemen get off the combo blocks even slower and giving his linebackers more time to diagnose the play and get to the ball.
That doesn’t mean Attack-React can’t work…
As we mentioned before, it doesn’t mean it can’t work, it just means it works in fewer situations.
Maybe you’re playing against an offensive line that isn’t very athletic and struggles to get to the second level. When analyzing the opponent O-line, ask yourself how often they’re making it to the second level.
If the answer is “not very often” then you can get away with a lot more slanting because it has no bearing on whether or not your linebackers stay free.
This will change from game to game depending on your opponents and your personnel.
Most of the kids Coach Manes has at the defensive line are short and stocky, but he also has quite a few wrestlers who are powerful and play through their hips and hands well. This is a great recipe for success with the React-Attack approach.
Four Ways to Coach the Nose
Now let’s talk about the man in the middle.
The nose in this defense should be your strongest and most powerful lineman off the ball.
Coach Manes goes through the four different ways you can coach up the nose in the clinic, and these may change from year-to-year, game-to-game, or even player-to-player depending on who you have in at that nose position at any given time.
So let’s go over them:
1. 2-Gap
This is the old-school way of coaching up the nose in the 3-4.
We refer to it as the “board drill” technique. He’ll line up head-up over the center, and wherever the ball bends, he’ll lock, peek, and shed A-gap to A-gap.
Most schools won’t have a ton of people who can do that, but this is how a lot of “prototypical” nose tackles would be coached up for years and years in this defensive scheme.
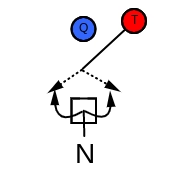
2. “Lag” Technique
Now we get to the most common way the nose is coached today. The nose will still be head up, playing that board drill technique. He’s playing into the chest of the center, and whichever direction the center goes he’s just falling back and taking away the cutback lane.
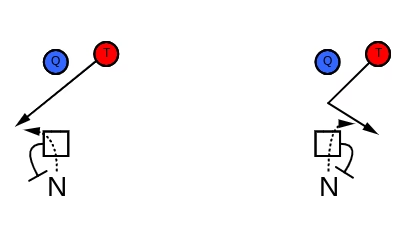
3. “Push” Technique
This is the opposite of the “Lag” technique we just covered in #2, but it starts out the same way.
This time, whichever way the center goes, the nose will fight the pressure over the top into the gap. He can either fight over the top by ripping or he can also press that center into the gap and make his move from there.

4. Slanting
This is the “cheapest” way of causing confusion and mayhem on the opponent offensive line, and most teams do some form of this.
Usually Coach Manes will run these slants with his second nose, who on his roster is a shorter but more explosive athlete than the starting nose.
The thing you have to make sure of is that your inside linebackers understand how their responsibilities change when the nose slants in one direction or the other.
In this diagram, if the nose slants strong, your Mike becomes the “Flow” player, and the Will is responsible for the weak side A-gap.
Having a right/left or strong/weak call is a simple way to add another layer to all the things that opponent offense has to prepare for.
Conclusion
This is just a small sample of all the information you can find in the incredible resource that Coach Manes has put together.
Want More?
Football Playbooks | Throw Deep Publishing Best Books | Throw Deep Publishing Best Videos